archive: Notes from Louise during her previous work life. From July 2010 ...
Joy is in the doing
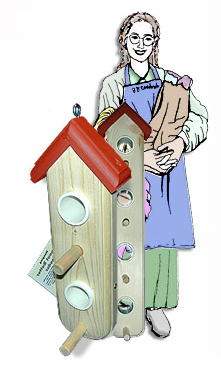
(this puppy came together in 39 steps)
 |
Recently
I had the pleasure of spending a couple hours with one of the manufacturers that has provided our shop with bird feeders, kits, bird houses, and other items for over ten years. It was amazing to see first hand the steps it takes to create an object out of a raw piece of wood, and in this case, reclaimed junk lumber destined for a landfill yet saved and turned into something useful!
The owner of GoodPlanet™ products was in the middle of the final assembly of his
Peanut Butter Feeder (like those shown, left).
"How many steps does it takes to make one of these feeders?" I asked. After brushing off the saw dust, he handed me a note pad and stubby pencil from his workbench so I could take notes as he began talking me through the process. He said “the lumber starts out in a variety of sizes and it must be ripped (cut lengthwise) then cross cut to length." The block of wood slowly becomes a bird feeder as he cuts the bottom corners before the final rounding on a bench sander. The feeder is then fed through a router to give the piece a decorative edge, and then sanded on a bench sander. These feeders have either two, three, or four holes that accommodate PVC pipe that will hold a peanut or suet mixture the birds will love! The drill press creates the holes to insert the PVC sections, as well as ½” holes for the perches made from wooden dowels that had been cut-to-length and ends rounded on the sander. Assembly is next: with feeders clamped to his well-worn workbench the PVC sections and dowel/perches are hammered through the body of the feeder. The PVC inserts are secured with a screw through a countersunk hole. “You sink the screw through just until you can feel a little bump on the inside of the PVC pipe, that way I know it is secured,” he said. Perches are secured with a brad hammered in place in a pre-drilled pilot hole After dusting the piece off with a large soft-bristled brush, the body of the feeder was now complete. The day before, he had already cut, assembled, and painted a first coat on the feeder’s little red roof. It was now time to add the roof with two rust-resistant wood screws. Each roof had been edge routed, sanded, glued, and nailed, and now they were being screwed into the top of the feeder. “I save the second coat of paint after the final assembly, that way I know they’ll be flawless,” he said. He also screws in a zinc-coated eye hook for easy hanging. The feeder was finished, and if my scribbling on the note pad was correct, it took approximately 39 steps to complete each Peanut Butter Feeder. I enjoyed the time spent with him in his workshop while learning about the extent of care and planning required to make these items for our little store. I liked looking over the 4-foot shelf lined with upright wooden “jigs,” thing-a-ma-dos that he has made to help him ensure each item he makes is uniform. Now I have a better appreciation for the craftspeople who supply our business with merchandise. I realize his joy is in the doing. Louise Dawson "The best gift is the one that includes a part of self." |
|
| edited for clarity and length | ||